21 Apr 2017

utee and resin challenge

the paper artsy challenge this week is utee and resin....love love love utee..not played that much with resin but hope to soon.you should go here and check it out

Had a bit of time yesterday so thought I'd have a little play with some utee.

I started off with an mdf atc and painted it with black gesso. then used a stencil and some black modelling paste for some texture. Next I got a small mdf heart and painted that black..then a coat of claret..then a tiny bit of brown shed and dusty teal with my finger. I pressed the heart into the embossing pad and then the utee...I did this about 4 times. On the last layer I inked up a stamp with black archival and pressed it into the utee while it was still hot..left it there until it cooled.
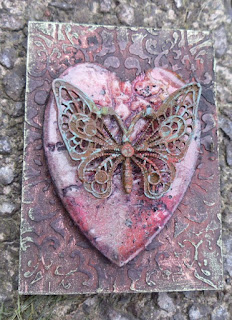


I rubbed a bit of treasure gold onto the atc in copper and green gold onto the atc then stuck the heart on. I rusted a butterfly charm ans stuck that to the heart.

Thanks for stopping by........................................

9 Apr 2017

Blue and Ochre 2

So here's another tag for the paperartsy challenge...you can pop over and see all the artwork by the designers and the lovely entries here..


I started off with a scrap of card which i coloured with a mix of fresco paints and inks.

I stamped some text in the same colours of archival and edged the tag with some stamps using black archival. Next I took a piece of tissue stamped with text and stuck that to my piece..I ran a small piece of metal through my big shot using a small tim holtz die with the umberella man and lightly brushed brass treasure gold over the raised part. Stamped Art on a spare piece of card and cut the letters out stuck them to the bottom..and done


thenks for stopping by.............................

blue and ochre 1

Hi all from sunny Hertfordshire...I thought I would do a couple more pieces for the paperartsy challenge of blue and ochre...and seeing as I am cutting it fine with the time again they will be very short posts I'm afraid. you can pop over and see all the lovely artwork here..some lovely stuff as usual
I started off with a large tag coloured some grunge paste using inks put that through a stencil and spread a selection of blue frescos over it..I then dropped some inks over the top and added water to get it to run and drip down the tag. I dripped some ink on a fabric flower and a couple of white ones and sprayed with water


I then coloured some ric rac and used it as a stem for my flowers..I roughed up the edge of the tag and then added some black archival around the edge


Added some gems to the centres and done

thanks for stopping by........................

2 Apr 2017

laugh as much as you br

Well there's another challenge over on the paperartsy blog....blue and ochre...great colour combo. So I thought I would have a play in my journal. You can pop over and see all the lovely work here...some great pieces.

 I started off in my moleskin journal I stuck some tissue paper and die cuts onto my pages...then some coloured grunge paste through some stencils I used 3/4 different blues from my fresco paints for the background. I also added some diecuts. Then added some pumpkin soup to the page. Using a mixture of paperartsy minis I stamped randomly in blue and ochre inks. Then using a stencil the quote Laugh as much as you breathe using black archival. I also added Art is good for your soul in stickers on the opposite page. I swooshed some dandelion archival randomly over the page..then thought stop!


Thanks for stopping by .......................................

26 Mar 2017

windows and doors

Another tag for the paper artsy challenge number 4. You can pop over here to see all the great pieces done by the designers.

I just did a simple tag using some houses which I think Chris sent me. I used broken china and peeled paint on the tag then brayered over with tinned peas and glass blue frescos..

I then stuck the houses on and enhanced the colours using gelatos and a whitre pen. I edged them with a black pencil.


thanks for stopping by......

paper artsy challenge 4

Haven't done a lot of blogging lately..life gets in the way sometimes..but have managed a couple of hours in my shed today. I thought I@ have a go at the current PA challenge which you can go see here. I decide on a tag as I wasn't sure how much time I would have to play.

I started with a large size 10 tag and had a play with my new oxide ink pads.. they are great you must try them if you haven't already
I used a gothic window die I had forgotten I had to be honest..

I used fired brick...spiced marmalade and fossilized amber inks. I stamped a couple of paper artsy minis on the background in walnut stain and black.


I stamped one of lynne perella stamps from this plate here number 034 behind the window and placed it on the tag..


thanks for stopping by................

5 Feb 2017

paperartsy cahllenge

Here's another pink and orange piece to enter into the paperartsy challenge ... I just love this colour combination.

I started off with a piece of board and painted it orange . I then laid a layer of grunge paste in two of the corners and stamped into it using one of Lin Browns stamps ELB30...love this set...a lot!

I had a lovely Tim holtz butterfly given to me by Lesley..I painted it with the orange and embossed it with enamelling powder. I also painted..stamped and embossed a tando fancy frame again using one of the small stamps from Lin's set.. Next I stamped some of the cute little stars and used some little black dress fresco to splatter then  stuck everything onto the tag. I tied some silk ribbon to the frame. I rubbed black stazon randomly all over..


thanks for stopping by........................................................

3 Feb 2017

Birthday owl

As my son was away on his birthday I wanted to make him something a bit more than a birthday card...so out came the mdf box and I picked an owl as I had decide to steampunk it..


I hope you can see it proerly..I painted it with black gesso and set about ading all sorts of embellishments until I was happy. I then used rusting powder and pigment to colour him finishing off with good old treasure gold


thanks for stopping by............................

powertex canvas

Trying to catch up on my blog by showing you a couple of things I made whilst being awol.

The first is a canvas I made for my daughter just before christmas. It's not an excellent piccie I'm afraid as it was taken using my phone


I started with a 12x12 canvas board.. painted it all over with bronze powertex. I then got 2 mdf heart from our mdf man and added some fibres around the edges. Meanwhile I added some fabric, stencilling and an assortment of balls and embellishments to my board before adding the hearts. The powertex sticks everything together. I added a frame and little cherub onto the small heart and a couple of die cuts to the large one. Once i wa happy with the layout I coated it all in powertex again and left it to dry.

When it was all dry I got the pigments out and treasure gold and just brushed over all the raised areas..and there you are

Thanks for stopping by xxxxx

2 Feb 2017

pink and orange

well my second post of the day is a single ATC I loved doing this and will be entering it into the Paper Artsy challenge here...there have been some lovely projects entered so grab a coffee and go have a looksee.


I started off with an acrlylic ATC and painter it with dolly mixture fresco and magenta decoart. I then added some tango paint and blended it in until I was happy with it I cut the wings from a Tim Holtz die and painted them with tango fresco. I stamped in black archival over the ATC and the wings.

I added a little silver spoon and put black frantage embossing powder in it and melted it until it started to drip out of the end. I also dropped frantage onto the surface and melted that. I added some rub ons and the word wish with my dynamo label maker and scratched some of the paint off of the acrylic.

Thanks for stopping by........

A pink and orange pocket letter

I cannot believe I have not blogged since june last year!! I have promised my self I will try and do better this year ...but you know how life takes over some times.

So I thought I would do two posts in one day!! My first post I am entering into the pa challenge which is pink and orange one of my fav colour combos...you can pop over and read all about it here I am doing a swap for a pocket letter Atc..so thought i would kill two birds with one stone.

I started off with a piece of pink card by tim holtz..I used a mini roller and added tango and sherbert frescos. When I was happy with the background I added some clear crackle glaze. I stamped in black archival a selection of PA background stamps. I then stamped a number on each one and added some rub ons..rubbed black archival around the edge and used snowflake to add some lines and circles

thanks for stopping by............................................................

12 Jun 2016

Perella House

Happy Sunday everyone! I managed to get a couple of hours in my shed today...seems like ages!! I have had quite an eventful couple of weeks and not in a good way. I am recovering from a very nasty abscess on the root of my tooth which was joined by a gum and bone infection all I will say is no food no sleep and PAIN!! And to top it all I missed my Angel class with my lovely crafty friends...so was not a happy bunny.

Anyway I am on the mend and will do my angel at home as soon as I see Sam and get my supplies. So I thought I would have a go at the paper artsy challenge which is our house. It had to be something simple as my shed is in a terrible mess and I can't find anything. you can pop over and see all the great projects here

So I basically had a little wooden house which I used some grunge paste on to give it a bit of texture..then painted it all with black gesso. I wanted to stick with black and white...no colour so I got out some of my favorite Lynne Perella ladies and stamped then on white card. I cut them out and stuck them into the little openings in the house. I used card to try and have them at all different levels. There is a door at the bottom which the piccies doesn't show up..

I added a resin clock again painted with black gesso and when it dried sanded it back so you could see some of the white underneath..


And there you have it quick and simple


Thanks for stopping by..............................

9 May 2016

mono printing

I had time for a little crafting over the weekend in between work shopping..cooking..cleaning and cutting the grass...and what lovely weather we have had!!! long may it last!!

I was very envious of some of my crafting pals who were able to attend Happy Stampers in Port Sunlight on Saturday...what a lovely place that is and a great show!

Leandra and Emma did a couple of quick periscope before it got busy and they were showing us a technique scraping the paint onto your surface using a scraper/old credit card or something like it.
I thought I might like to have a go....so using layers of mermaid..blue oyster..caramel..chalk..tango..beach hut and hey pesto fresco paints I made my background.


Onto this I stamped in cornflower blue archival with a crackle stamp some script and one of the small stamps from one of my new hop picks


I cut my piece up to make a background and smaller piece which I stamped in black archival again from one of the new hot picks I painted the flower and added some hightlights with a white shaprie. This was then mounted onto black card..added to the larger piece and onto a card blank.


I am going to enter this into the Paper Artsy topic 9 challenge which you can go and read all about here as usual some lovely work.

Thanks for stopping by....................................

27 Apr 2016

white space in black

Another entry for the PaperArtsy challenge..white space...you can check it out here. I loved the black page on the blog, that was my inspiration..

I did a simple journal page spread...painted firstly with black gesso and then little black dress fresco acrylic. I then added some texture with black modelling paste.
 I cut a frames,heart and wings from different dies. The heart was coloured with barn door distress ink and then clear crackle over the top. the wings were painted with little black dress and clear embossed and the frame with pewter fresco.the sentiment is from one of Finn's stamp sets. Once it was all stuck onto my page I added some perfect pearls and treasure gold to bring out the texture...oh and some black lace to balance it a bit more....


Thanks for stopping by...................................................

22 Apr 2016

White space in Green

Topic 8 over on the PaperArtsy blog this week is white space...you can read all about it here


I started off with a piece of smooth white card and painted it in sage green fresco paint. I stuck some tissue paper across the middle of the card scrunching it up before it dried. Then some Tim holtz tattered flowers an assortment of flowers from my stash..and some sand balls. When it dried I painted it all over with the sage green..then dry brushed it with snowflake...stamped happy birthday in black archival and done....


Thanks for stopping by....................

17 Apr 2016

powertex sculpture

I have been having another play at a powertex sculpture...this time using an armature instead of half a barbie lol.

I have to say I so enjoyed this and I love him!! It would take me ages to walk through everything but I basically made the armature and bulked him out with some tin foil the wrapped him in masking tape.

Next I played around sitting him on the paper mache books until I was happy with him. I made some trousers and jacket just roughly sewing them into shape and off I went. Dipped it all in powertex and dressed him...I added different bits of his clothing in stages and when he was dry I added a few different colours of treasure gold.


Thanks for stopping by....................................................

14 Apr 2016

A little play time

Seeing as the weather has  started to look like spring really is around the corner I have found myself wanting to be out in my shed more and more.
So I have had a little bit of me time this week after an extremely hectic weekend with the grand national on Saturday and Ally Pally on Sunday a bit of relaxation was definitely needed!!

Firstly I was playing around with a beer mat...one of a few knocking around in my shed and decided to make a little book. I painted it black and added a layer of crackle glaze then chalk fresco paint. When it had finished cracking I rubbed a bit more of the chalk off to age it some more. Then I rubbed in some quin gold around the edges and stamped some script in black archival.
I painted a piece of weathered clock die and stuck it into the corner. The picture is a domino download from etsy..I cut it out and mounted it onto some black shiny card..I stuck it on with silicone glue so that it could be slighly raised and the filigree piece could be slotted just underneath it. I added some paper roses with some tiny gold beads over them and parts of the front cover. I used some sticky embossing powder to add some foil.


 the back was done in the same way...


For the pages I just used some prima paper. I used some grunge paper for the spine and tied the pages using a dark twine. I can't decide whether to add a closure...will have to think about it


I also started another powertex sculpture which is a work in progress...but we'll save that for the next blog post

Thanks for stopping by..........................................................................

6 Apr 2016

Altered playing cards


Short and sweet today....I am in a group that have different swaps most months and this months theme is playing cards. We had to make 9 but I ended up making 10...here they are all finished and waiting to go to my swap partners...


Thanks for stopping by.....................................................

3 Apr 2016

barbie gets all dressed up!

Happy Sunday everybody! Still waiting for the sun to make an appearance here today...it's trying but not quite...
I had another play with my powertex yesterday...love that stufff..it is sooo addictive.

It was barbie who got the treatment...I must admit to cutting her in half and just using the top half of her body. I used one of those meat bashers to stand her on I secured it with masking tape. I gave her a bit more shape with some foil and more masking tape and painted the whole thing with black gesso as part of the doll was plastic and powertex won't stick to plastic.

So out came the bronze powertex and I soaked strips of an old linen scarf . I wrapped it around her body and draped the last piece over the stand. I added a looser weave fabric over the top to give it a bit more texture.I made her a hat with a piece of card for the rim and fabric for the top part. I cut a small flower out of fabric and added that to the side. She also has a scarf made by twisting the fabric and just dropping it over her shoulders. I painted it all with the bronze powertex making sure her face and hands where covered.


When she was dry I dry brushed some lindy's magicals over her in blues and greens. I used olive bronze treasure gold on the base.


I found it very hard to take any decent piccies as she is so dark but hope you can get a good idea what she looks like. I am very pleased with her and will be entering her into the paperartsy challenge which you can read all about here.


Thanks for stopping by..................................


2 Apr 2016

Fabric Stiffener

The current topic over on the PaperArtsy blog is fabric stiffener. when I saw this I thought woo hoo as we had discovered Powertex on a trip to Glasgow last year and I love the stuff!! Very messy but great fun.You can pop over to the blog and have a look at all the wonderful pieces here. I had to try and make time to do a piece. So killing two birds with one stone my daughter wanted me to make something for a birthday gift..so out came the poweretex.

I had an ikea frame had been knocking around in my shed for a while...just waiting to be altered. I used ivory powertex. I soaked some white muslin making sure all the cloth was covered and then manipulated it to open up the weave a bit more. I placed it all over the frame. I added more across the top, the corner and down the side just letting it drape. I also added some paper decoration..which I dampen and dip into the powertex..it kind of falls to pieces but adds a lovely tattered look.

Next I cut some tattered flowers from my tim holtz die and laid them on..using different fabrics on the different layers. I find if you leave it to dry for a bit you can then manipulate the flowers with a bbq skewer. I also tore off some strips of cotton fabric and wound it around my fingers to make some rose buds. I added some more powertex in little puddles and dropped in some sand balls. When everything was dry I sprayed some tattered angels gold and a little bit of heirloom gold perfect pearls.
Lastly I added some gold gems randomly and a touch of brass treasure gold on the balls.

I do apologize for the picture...although it is lovely and sunny it is very awkward trying to take piccies of a mirror..


Thanks for stopping by................................................