Showing posts with label Grey board. Show all posts

29 Jun 2014

Love

I have spent a nice couple of hours in my shed finishing off a birthday card and thought while I'm here I 'll have a go at one of the Paper Artsy projects. Kate Yetter was back this week with some smashing work..you should pop over and have a looksie here. I really love her style..think I've told you that before lol. So I thought I would have a go at her Tag board. I followed along with what Kate did so won't repeat the process. I didn't have the stamp she used so used one of my paper artsy A5 plates. I really love this stamp but it the first time I have used it..so here goes..


 I used more or less the same colour palette as Kate as I love blue and brown together...


Thanks for stopping by...................................................


5 Jan 2014

Paper Artsy Christmas Cracker

Hello lovely blog followers!! hope you all had a wonderful Christmas, and that you all have your Christmas trees and decs down by today..and that means you Leandra lol!!

Leandra did 3 lovely pieces on her blog in the last few days and for each challenge there is a prize of some A5 brand spanking new 2014 stamps and some limited edition paints..well if that's not a good enough reason to enter I don't know what is!!

Video 3 was called painted clusters..a Finn style piece with fresco paints..my favorite!! Didn't have time to do all three so chose this challenge.... I absolutely love this technique so pop over and have a look here.

I followed along with what Leandra did so won't bore you with all the details you should go over and watch the video,step by step I am so glad I bought some heavy duty gel medium though as it makes it so much easier to get everything to stick.

                   I didn't take a piccie before I painted the first layer


This is the finished piece using honey dew,guacamole,sage,crushed olives and holly frescos and olive bronze and brass treasure gold.


I'd like to wish you all a very happy new year!!
thanks for stopping by..........

9 Dec 2013

A New Baby

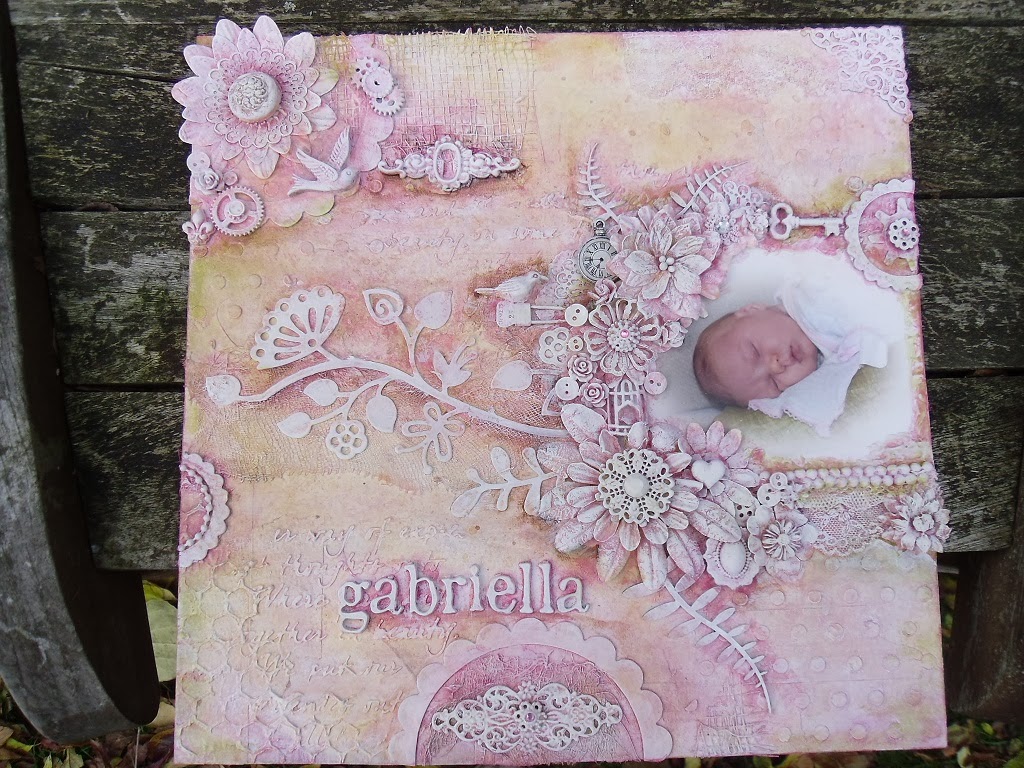
I think a new baby is something that puts a big fat smile on most peoples faces..so when little Gabriella arrived I wanted to do something special. I have admired Finnabair's style for a long time but have yet to attend one of her classes. I have watched loads and loads of tutorials on you tube of pieces inspired by her so decided I would have a go..

So off to Boot's I went to get a real photograph printed. I chose one of her lying on stomach and set to work.

I took a piece of grey board 10x10 inches and gave it a coat of snowflake, then decided where to put the photograph. then it was just a matter of placing loads of embellishments.flowers, buttons,filgree wrap,die cut...what ever came to hand. The layout was inspired by Gabrielle Pollacco, you can watch here

                                             Work in progress


               Then when everything was stuck down I painted it all white.


Then it was time to add some colour so I watered down some butternut and some very berry and sprayed it randomly making sure to dry in between sprays. I added some glimmer mist in toffee apple mainly around the embellishments. Dried that and added some more very berry to the bottle and concentrated that around the embellishments.Next I used chocolate pudding to add a bit of a shadow around the raised bits and dried that off

Once that was all dry and I was happy with the colour I dry brushed  all the raised bits with snowflake to bring them all to the front again...

                                     Here are some close ups...


                And here is the finished piece!! Isn't she just too gorgeous :D


I absolutely loved working on this project because there are no rules!! and I am very happy with the finished piece which is not something I often say, and the proud new parents loved it!!! and that is what I wanted..so as they say job done!!!

I will blog some more piccies of the baby and family soon...

Thanks for stopping by.....


3 Dec 2013

Sculptered Book

I have been seeing these books in blog land and also on you tube..they are also called book art or origami book art....you should check them out as some of them are amazing!! So I thought I would like to have a go.

I used an old Dickens book which had nicely discolored pages and set about folding them back on each other into the centre. You don't have to glue them they will stay in place. I then very lightly inked the edges with some walnut stain distress ink.

Next I chose some paper to line the insides...I believe it is my minds eye from a Christmas stack. I distressed the edges and inked them and stuck them in leaving the edges curled slightly.


On to decorating..I used some lovely green velvet ribbon to hold the book at the angle I wanted it to sit. I coloured some lace with watered down green olives fresco and stuck that onto the edges of the pages.


From a selection of movers and shapers dies I cut three reindeer and the number 25.I painted the reindeer with a combination of brown frecos and the 25 with claret and london bus.


I then used antiquities from ranger to give them a slight frosted look. I stamped the holly leaves onto some christmas paper, heat embossed them and cut them out. These were shaped and placed onto the book with silicone glue and some pearl beads coloured with red pepper alcohol ink were placed in the middle.The reindeer were stuck in.


I found the poem 'Twas the night before Christmas' online and printed it out onto parchment in as small a font as I could. I distressed it and concertina folded it into a little book I had made from grey board and grunge paper. This had a filgree wrap cut in half with a metal bead spacer as a closure with some wired thread.


This was stuck securely on the bottom of the book.


I had bought some really cute wooden tags and stars from Ally Pally in September and thought they would finish it off. I stamped joy with crimson archival onto the tag and put some red wire through the top.
The stars had the antiquities on them and were put along the bottom of the book


                               So here it is finished........


  Thanks for stopping by.........

*What I didn't write in this post at the time was that the book was going to my sister in the USA!! I posted it off on the 14th December..paid a whole lot more to have it delivered in 4 days and did it arrive?? NO!! It finally arrived on boxing day..which happens to be her birthday and I was talking to her on Skype when the postie knocked on the door...so saw her open it too which was nice :D she loved it!! so all went well in the end and she has something I made out of something that belonged to our beautiful mum to bring out every Christmas!!! Hope you have all had a lovely Christmas and a happy new year to you all xxx*


10 Nov 2013

A couple of tags

Alison Bomber was back this week over at Paper Artsy with some stunning projects as always..you can pop over and see them here. On day one she did some gorgeous tags which is where my inspiration came from..


I used the same techniques as Alison..using frescos with stencils and stamps for the back ground. I cut the arches from a die I bought at Stevenage from once upon a stamp and painted,crackled and distressed them. I didn't have rusting powder for my embellishments so used distress embossing powder instead. Once everything was assembled on the tag I used rafia and string to tie the top. I really enjoyed this project so thank you Alison for a great week!!

thanks for stopping by...

3 Nov 2013

Inspiration from Jo

Over on the paper artsy blog this week we welcomed back Jo Myhill with some great projects you can see them here My piece was inspired by all the techniques she used this week...

I started off with a piece of grey board and painted it with holly and crushed olives. when dry I added crackle glaze and put that aside to dry.
Next a piece of an old cardboard box with a bit of the corrugated showing, I painted that in  mix of green frescos, and a tiny bit of beach hut. I then stamped the key from LP013 in olive archival.
Back to the crackle glaze, I painted a coat of honey dew and dried it off with a heat gun. Then added some hey pesto and beach hut with my fingers. when that was all dry I stamped the script from backgrounds 2 in coffee archival.


I took a piece of hessian and painted it with watered down choc pudding and a bit of squid ink, sprayed it with water and scrunched it up and left it to dry naturally. I made the flower with thick mulberry paper and the primitive hearts die by sizzix and painted in honey dew and beach hut, added a small flower and sizzix button in the centre. I edged it all in black soot distress ink and layered it up with foam pads and silicone glue.

Thanks for stopping by.....

27 Oct 2013

Sewing Room

The October challenge over on the Arty Inklings blog this month was 3D with a sewing theme...you can pop over and have a look here well I had this mannequin sitting on my desk for ages and nowhere to live lol.. I had made it one day when just playing around with the die and some old book pages.

I painted a piece of grey board with mermaid and bora bora fresco paints and stamped with coffee archival ink. I cut some lacey borders from a Tim Holtz die strip and stuck around the edge after painting it with chocolate pudding.


I have a big bag of empty spools so took 4 and painted them brown and used them as feet for my little stand. I then took 3 more all different sizes and coloured those too using a mixture of mermaid and chocolate pudding. I wrapped assorted lace and ribbon around them. I painted a small metal tin with little black dress and french roast and filled it with ribbon and buttons..laid the scissors across and voila!!

My sis in the USA would love this but not sure it would survive the journey!!

Thanks for stopping by....

8 Sept 2013

Swanstitch challlenge

It's time for the September challenge over on the Artyinklings blog...you can read all about it here..

Anita did a lovely canvas and asked us to do our own interpretation of it, and here is mine.


I didn't have a canvas as such so used a sheet of primed canvas from a book. I stuck it to a piece of grey board. I painted it with butternut, smoked paprika,claret,haystack and pumpkin soup frescos. I layered and blended them until I was happy with the background. I cut a dress form using a sizzix die out of some this plastic I got from paper chase can't think what it's called. I mixed some grunge paste with black paint and stenciled it onto the canvas. I also used another stencil up in the corner with plain grunge paste. When that was dry I put the stencil back over it but bumped it slightly to get a white shadow effect.
Using a mask I went around the dress form with a different stencil, then went over the whole canvas again with the original colours. I stamped some script and dots on the dress, randomly over the canvas and added a bow. I used Florentine treasure gold to highlight the stand on the dress form Stamped a quote with a Wendy Vechi stamp and added some small black pearls up in the corner. Edged the canvas with little black dress and done!!

25 Aug 2013

Ta Dah

Well it was a bit of a challenge but here it is inspired by Helen Chilton...you can see it here


This had to be the fastest thing I have ever made 55 minutes lol..but the challenge was there and it wasn't so hard working on both sides at once!

                                                   
thanks for stopping by.....

15 Aug 2013

Love that bees wax..

I have spent a nice hour or so in my shed this morning making wax ATC's. Now I have never done ATC's  before but was inspired so much by Frances 10th birthday project I wanted to have a go...you can see hers here. I have worked with the wax in a similar way in a class with Lin Brown and really enjoyed it so I thought I can do this lol..I followed along with Frances' instructions so won't bore you with the details except I didn't have any of the encaustic medium so had to skip that bit. I stamped in Stazon using the butterfly from hot pick 1109 and mini 62....and here is the end result!!


thanks for stopping by..


16 Jun 2013

Inspiration from France Papillon

Well France was back on the paper artsy blog this week, she did 3  great projects and a video on day two you can see them here.

My project that was inspired by France is a bit of day one and a bit of day 3..I didn't have a mini chest of drawers or any little bottles for the canvas, so I had a rummage and found a wooden calender thingy that I bought at an artsy crafts many moons ago!


I started of by scraping tinned peas and sage all over the piece with an old credit card. I than scraped crackle glaze thinly all over and left it to dry.


Next painted a thick coat of snowflake for nice big cracks..


 I made a lid for the numbers out of greyboard and put little piano hinges on it so the top could open..It is painted he same as the main piece. I then stuck it across the opening and added some lace along the front.


I stamped  the script form backgrounds 2 randomly all over in coffee archival..I watered down some snowflake and tinned peas and roughly rubbed it over the wooden blocks.


I cut a piece of wire and dabbed it with chocolate pudding and french roast, I then stuck in on the back. I twisted some strips of wire and placed those over top and then placed a die cut book plate over the top of that.. It has a quote inside which reads *enjoy today,live for tomorrow and dream for the future*. I added a hitch fastener to the top so the lid can be opened to change the days and months.
Finally I Edged the whole piece with coffee archival and as France would say Ta Dah..

thanks for stopping by...


8 Jun 2013

PA challenge with Sue Carrington

Haven't had much time this week to join in with the Paper Artsy challenge..but Sue did get me inspired with her Sewing box on day one. I need somewhere to put my cotton so thought I'd have a go. I didn't have a wooden box so used a paper mache` pencil box instead.

I used pinks and white for my project...not that I am a pink kinda girl but because my baby sewing machine is pink!!


I started off by painting it all in very berry fresco, left that to dry while I ran the mold with the metal through my big shot., (a technique shown to me by  Lin Brown). I had to join two pieces together as I wanted to put it on the top of the box. I painted it all in very berry and blended some sherbert into it, and left it to dry.

I then embossed some more metal with a little lace edging mold and painted it the same way. When it was all dry I stuck some white lace around the lid of the box and then added the larger metal piece. I stuck the lacey edge one around 3 sides of the box. I swooshed some white paint over all the metal using my finger and then added some platinum TG. I made some feet with some greyboard layered up and painted.

I stamped the tape measure onto crackly tissue paper with Victorian velvet distress ink and painted it white on the back. I then stuck it to a piece of white tape and sealed it with matt medium. This was stuck onto the top of the box along with some metal scissors and corners which had been painted to match the box. Lastly I added some buttons to finish it off.
                                                                                    
                         Now all my cottons have a nice new home...


 Thanks for stopping by.......


22 May 2013

Carol Quance beaded hanging

Carol is the GD over on the Paper Artsy blog this week and on day one she did a beautiful beaded hanging...you can pop over and see it here.


Now I didn't have any hanging boards left in my stash and I didn't have any fibre paste good start eh? so I had to improvise..

I started off by cutting up some thick grey board and gluing four pieces together..(it's not very straight). I sanded the edges to smooth it out and saw there was a lot of fibers from the grey board on my mat...so I mixed it in with some grunge paste and voila fiber paste!! (well not quite but nearly). I used the diamond stencil down the side as Carol did and then stenciled some wording randomly over the rest of my piece.

I painted it all in honey dew and then started adding layers with haystack. pumpkin soup smoked paprika limelight and hey pesto..

I used part of a stamp from Lynne Perella 008 onto crackly tissue with black archival. when it was dry I painted on the back using snowflake for her face and a mixture of the other colours for the rest of it.

I glued the image to the board and added some lace and gems to the bottom. I stamped a small script stamp randomly using olive archival and then stuck some beaded curtain trim around the base and lightly dusted some olive bronze and copper treasure gold around the edges. I didn't have beads for the top so twisted some green and gold ribbon together and tacked it to the sides..

Thanks for stopping by...